This knowledge article will guide you through creating a GlobusID, connecting to the Grid using the Globus share, configuring Globus Connect Personal to upload and download files, and creating a shared collection. For more tutorials, see the Globus Documentation.
What is Globus?
Globus is a cloud-based service designed for users to move, share, and manage their data easily, reliably, and securely.
What you can do with Globus:
- Transfer files: Move data of any size between systems.
- Share files with others: All you need is an email address to share data with colleagues–Globus manages authentication and access.
- Automate data handling: Use the scheduling tool to transfer data on a regular basis or with Globus Flows design and execute secure, reliable automated data flows at scale.
- Compute from anywhere: The Globus Compute platform enables you to execute functions on diverse remote systems, from laptops to campus clusters, clouds, and supercomputers.
Step 1
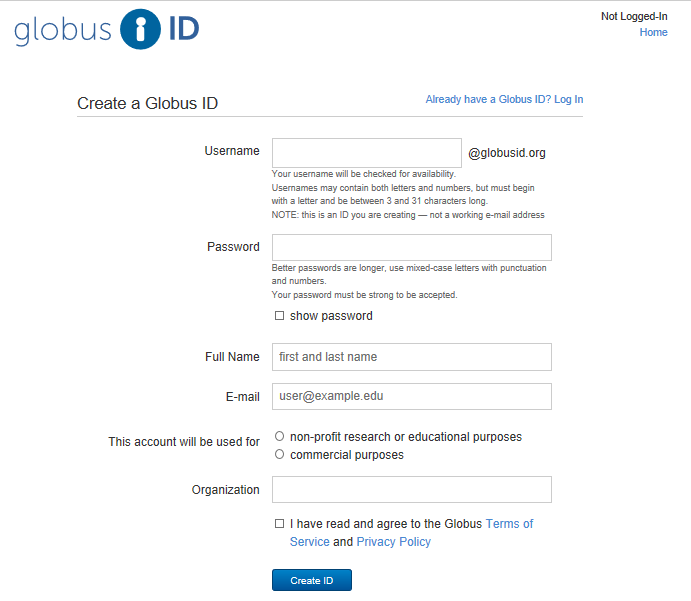
Create a Globus account. Instead of using your organizational login, create a Globus ID.
Step 2
Visit the Globus website and click login in the top right corner.

Step 3
Click the link to sign in using your Globus ID and enter your login credentials.
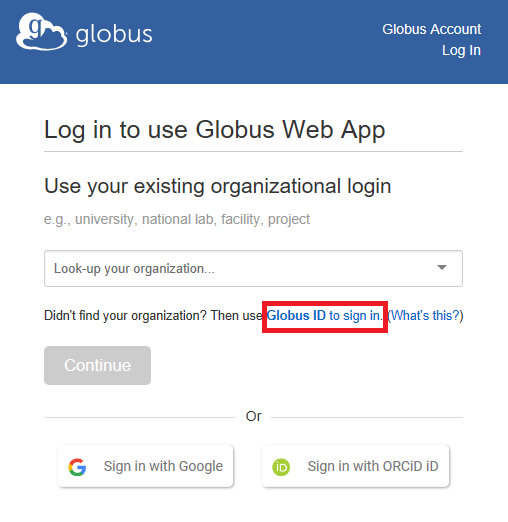
Now you are logged into the Globus Web App with your GlobusID Account.
Add the WSU Grid Globus Collection
Step 1
To add the WSU Grid Globus Connection, go to File Manager on https://app.globus.org/, and type into the Collection input box: wsugrid#globus.

Step 2
Once you have entered this, a list of possible connection results will appear, select the “wsugrid#globus” connection.

Step 3
You will be asked to consent to Globus accessing your WSU grid account data. Click Continue to authenticate.

Step 4
Then, you will be redirected to a new page asking you to authenticate. Enter your WSU credentials and continue following the instructions provided to allow access.


Step 4
You can now access files that are in your home directory on the Grid. If you have a group directory, you can also enter the path to it and access it

Step 5
The user can now access the data and transfer the files. They will need to install "Globus Connect Personal" to transfer files to their local system, which can be downloaded here.

Configure Globus Connect Personal
Globus Connect Personal allows you to create a Globus Collection on any PC or laptop.
A Collection represents a location containing data plus the policies and permissions for accessing that data.
Step 1
To download Global Connect Personal, follow the instructions for your operating system:
Step 2
After the installation has finished, you will be directed to log in to Globus Connect Personal.


Step 3
You will be prompted to enter a label and to give permissions for Globus Connect Personal Setup.

Step 4
A new window will open asking you to fill out Collection details. This will be how you create a new collection. Enter your Wayne State University email address, a Collection Name, and Description of your choosing, and leave the High Assurance box unchecked. Click Save.
Note: In this example, the Collection Name is Globus_Test


Step 5
Once you have completed the setup, open the application. The Globus icon should appear in your system tray/menu bar (the “^” button at the bottom right of your taskbar on Windows or the top right corner on Mac). Right-click on it and click Options.
Step 6
The window below should appear. To add a new folder from your personal computer, select the “+” button to browse your computer and select which folder(s) you would like Globus Connect Personal to have access to. Then click Save.

Step 7
Return to File Manager on https://app.globus.org/, click Search next to collections, and select Your Collection. You should now be able to view the contents of the folder you added in the previous step.


Uploading Files
Step 1
Go to File Manager on https://app.globus.org/ and select the wsugrid#globus collection (the WSU Grid) and your collection (local computer), with the setting of two panes (found near the top right).

Step 2
Select the files you wish to transfer, then click Transfer or Sync to....

Step 3
Then you will be directed to the destination side of the pane and will select which folder you wish for the files to be transferred to. Once you’ve selected your destination, click Start, and a notification will pop up saying Transfer request submitted successfully.
If you wish to view more details on the transfer process, select View details.

You will be taken to this screen after clicking View details.

Step 4
Once the transfer has been completed, go to your destination folder and you should see the files you’ve transferred appear within. Inside the destination folder, you may have to click refresh list for the transfer to show.

Downloading Files
Step 1
Select which file(s) you wish to download. You may select multiple files by clicking on them. Click Download to download the files onto your local computer.

Creating a Shared Collection
A Shared Collection is for users who wish to share files or folders with others. A Guest Collection will be created, acting as a point of access used to share data with other users.
The user who creates the Guest Collection gets to set permissions on it, determining which other users are allowed to use it. These users are the "guests" of the Guest Collection.
Step 1
For this tutorial, we will select the folder called "bar," which will be highlighted once it has been selected. Multiple files can be selected by simply clicking on the files.

Step 2
Click the three horizontal lines on the top right and click Share on the right command pane.

You will be asked to provide access to Globus Web App.

Step 3
Click Add Guest Collection to create a new collection for sharing data.

Enter a “Display Name” and fill out any other information you wish to provide. Then click Create Collection.

Step 4
Click Add Permissions - Share With.

Step 5
Enter the Globus username or the email associated with a Globus account of the person you wish to share this data with and click Add.
Data access is only available to those who have Globus accounts. For those who do not have accounts, please refer to steps 1-3.
Note: Do NOT select 'write' unless you are positive that you want the user to be able to make changes to the data.

The user will receive an email similar to this:
